By Nicki Byrnes
February 15, 2025
Looking to design your own sweater but unsure where to start? I’m here to guide you through each step so you can bring your crochet dreams to life with confidence.
I know how tricky it can be to go from an idea to an actual finished piece. I’ve been right where you are, and I can attest that finding clear, easy-to-follow instructions is often the hardest part. But once you figure it out, it’s incredibly rewarding!
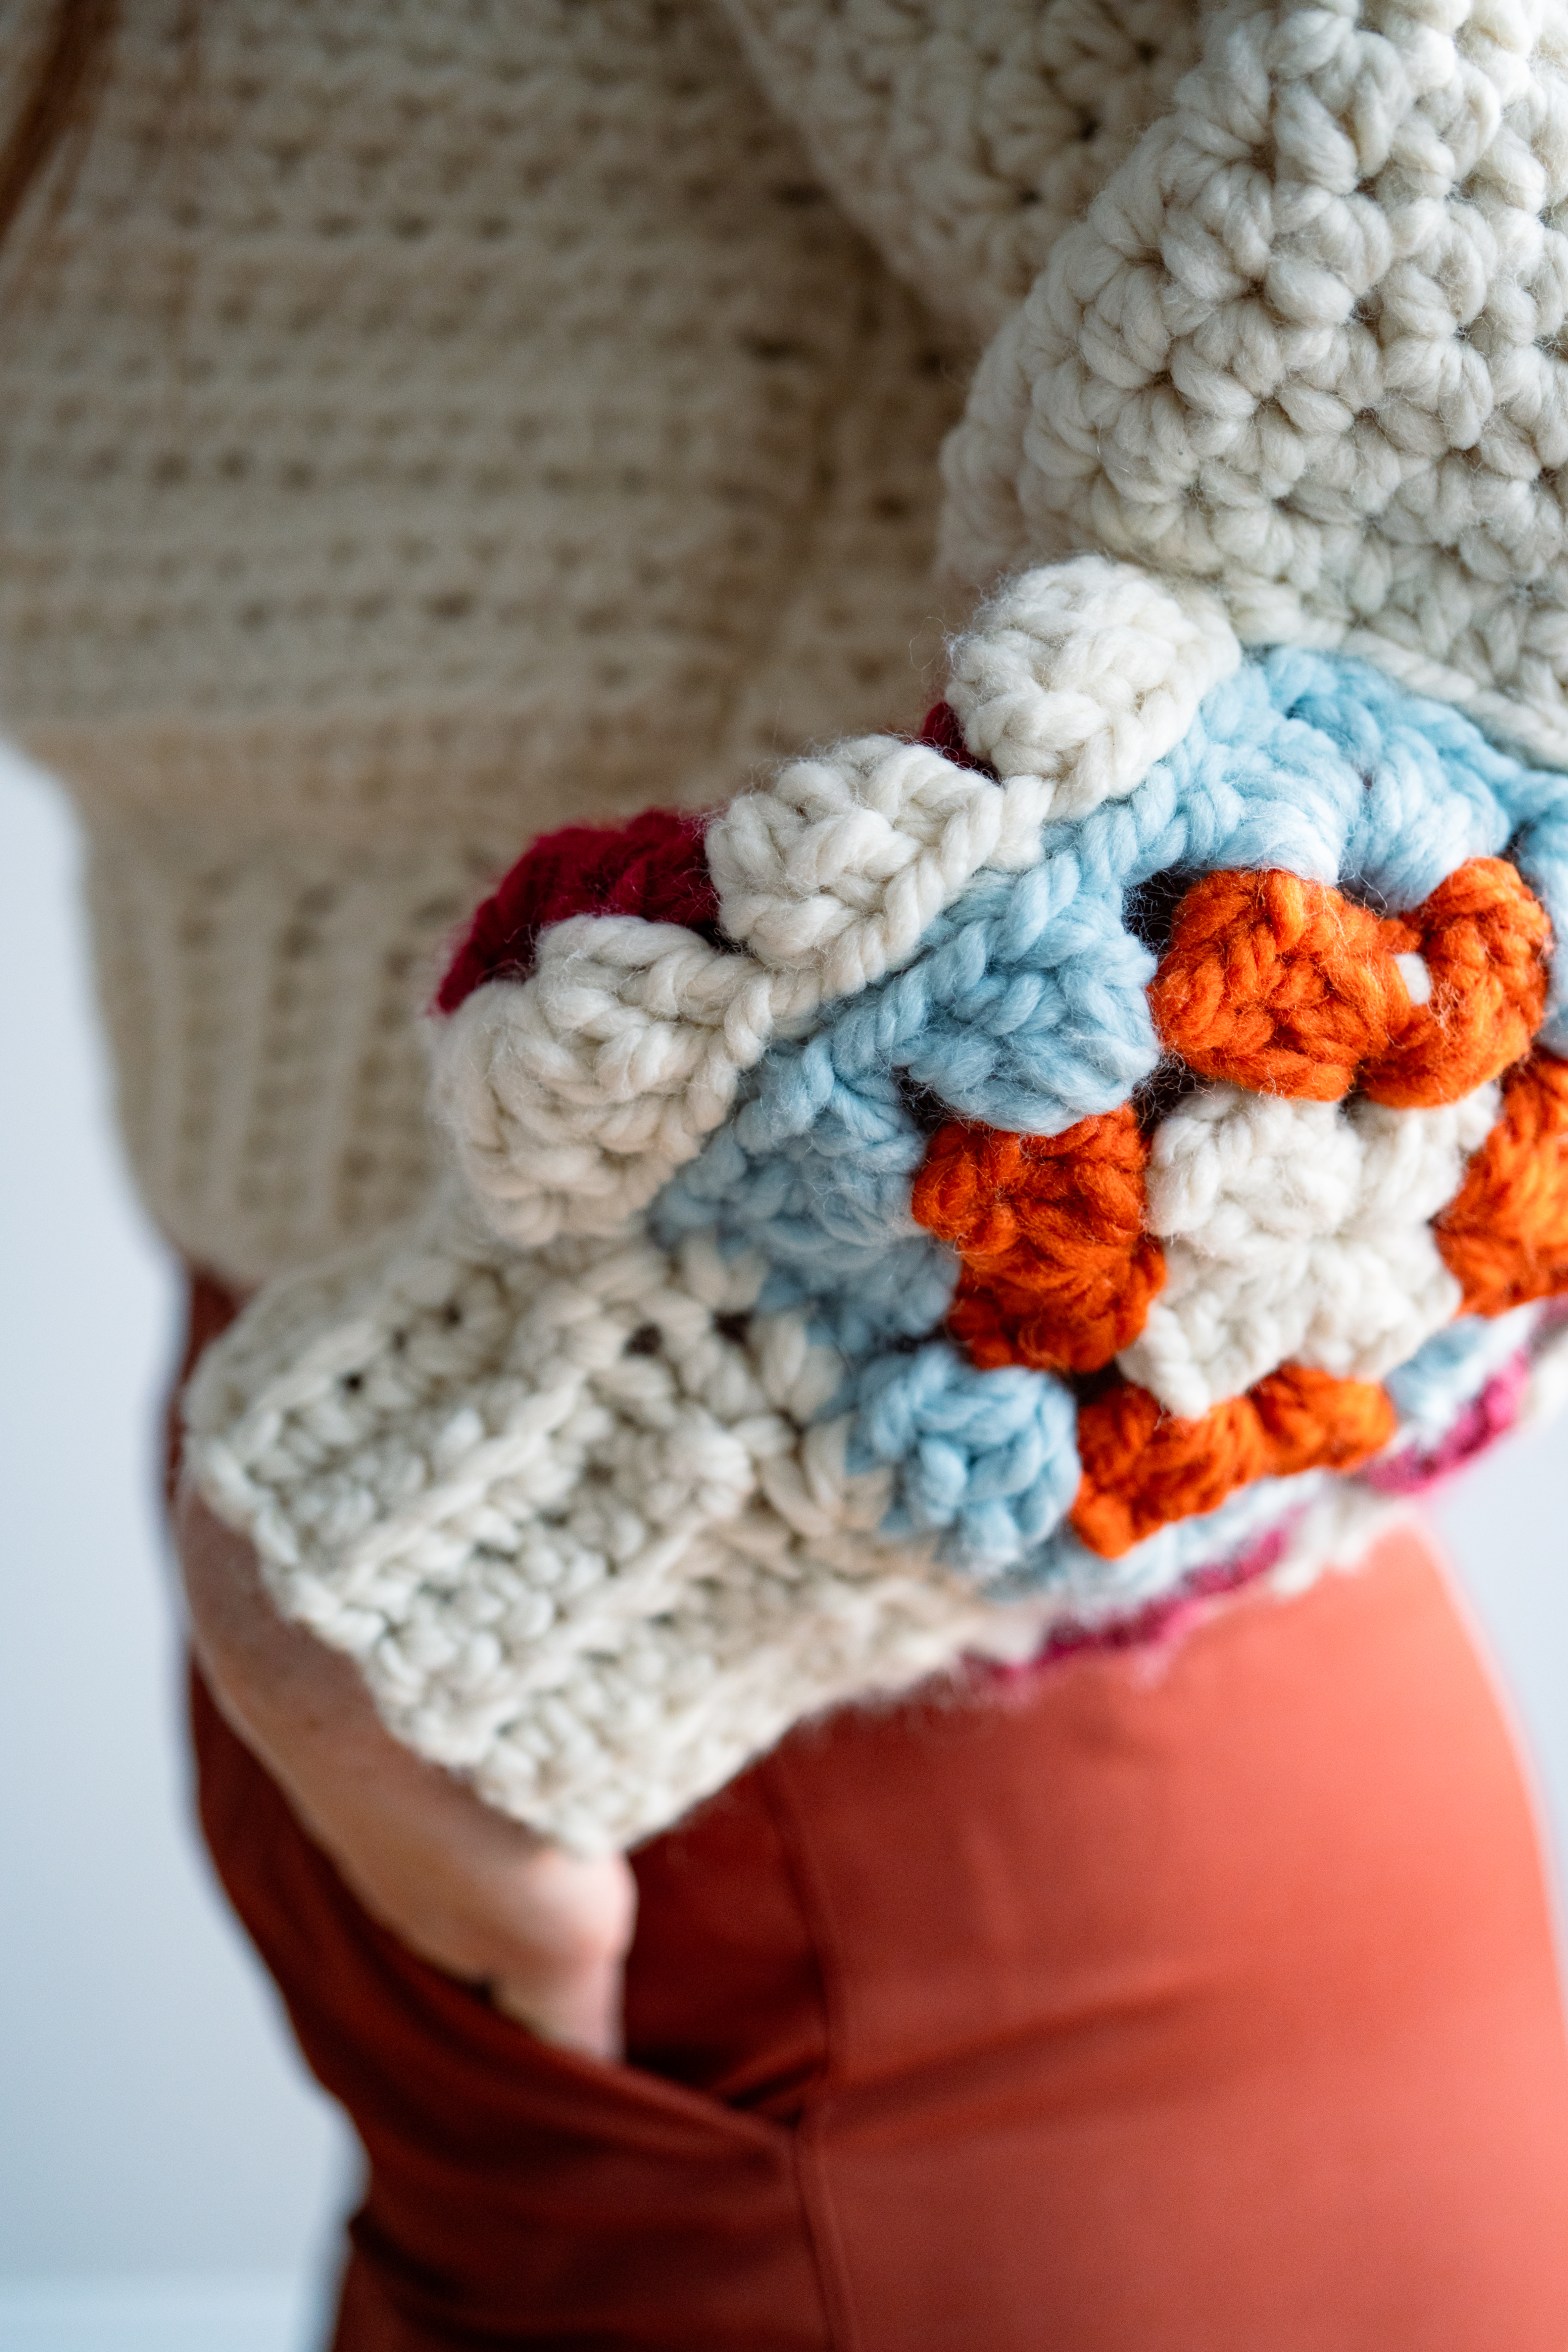
Case in point: here is one of my published crochet sweater designs and its pattern — the Granny Square Sweater, which was featured on the cover of I Like Crochet magazine. It’s a perfect example of how satisfying it is to see a design come together.
If you’d like to try crocheting a sweater of your own, this pattern is a great place to start. It’s beginner-friendly, teaches construction and assembly, and results in a warm, stylish, handmade sweater you’ll love.
This sweater was featured on the cover of the magazine, as shown below.

It’s a fun, beginner-friendly project that results in a warm, stylish, and completely handmade sweater you’ll love wearing.
Now, onto the steps to designing your own crochet top:
Key Steps
1: Sketch your crochet top: Start with your idea or vision and sketch it onto a piece of paper or digitally.
2: Decide how your top will be constructed: Choose the way your pieces will fit together to create the top.
3: Draw your individual pieces: Draw each piece you will need to crochet.
4: Determine your size: Gather measurements from the Craft Yarn Council.
5: Make your gauge swatch: Crochet a square to see how big your stitches and rows will be.
6: Calculate stitches and rows: Use your measurements to figure out the right number of stitches and rows needed for each piece.
Once you’ve completed step 6, you will have all the information you need to crochet your individual pieces and then assemble them by seaming or sewing them together. For a smoother, more refined finish, some crocheters choose to block their garments, which helps them feel softer and drape better. I don’t always block my crochet items, but when I do, I use a simple process which I explain in this post.
Please Note: This guide outlines the basic, foundational steps I used to design my first crochet sweater. While there are other methods, this simple process will give you a solid understanding of design and construction.
Step 1: Design your crochet top
It doesn’t matter how well you draw. Put your idea down so you have its shape and design. Jot down what type of stitches you will use. Here’s a great book that lists a ton of stitch options and gives important info you may use later as you get further down your crochet design journey.
I recommend starting out simple, like all half double crochet, so you can put your energy towards understanding the process.

Step 2: Decide how your top will be constructed
Based on your sketch, figure out which construction type will work best for your sweater shape. Here is an article that is helpful: 6 common ways to construct a crochet sweater.
For simplicity’s sake, I am using a drop shoulder sweater as our example because it only requires two rectangles (for the front and back body panels) and triangle-ish shapes for the sleeves.
Step 3: Draw your individual pieces
Under your sketch, draw the components or pieces that will make up your sweater. For example, the sleeves, body panels, and any waistbands, cuffs, or collars.

Step 4: Determine your size
In order for a garment to fit properly, it is critical to follow industry standard sizes. Fortunately, the Craft Yarn Council has a body measurement chart where you can get measurements needed for Baby, Child/Youth, Woman, Man, Head, Foot, and Hands.
If you want to make a women’s size Small, for example, you will look at the Standard Body Measurements/Sizing to see which body parts you need measurements for, and then the Women’s Size Charts to write down the dimensions they list.
Gather the measurements you need for each of the pieces you drew in Step 3 and write them down next to your sketches. This tells you how big each piece needs to be (how long the sleeves need to be, for example, or how wide the body panel should be to fit a standard Women’s Small).
Notice many of the CYC measurements are circumferences, so divide them into two if you are creating just a front panel and then a separate second back panel that you’ll sew together to make the full body part. Once seamed together during the final assembly stage, their circumference should match the circumference listed by the CYC.


Step 5: Make your gauge swatch
In Step 1, you identified what stitch(es) you want to use for your top. You now need to create a gauge swatch, or a 6″ or 8″ square, using the exact yarn, stitch, and hook you will crochet your sweater in. If you are using different stitches in the sleeve versus the body, you will need swatches for each different type of stitch. Again, I recommend starting simple. Just use one stitch for your first sweater.
Crochet your swatch and write down how many stitches are in 4″ across and how many rows are in 4″ up.
Here is an example. Let’s say we make a 6″ square gauge swatch and it shows there are 8 half double crochet stitches (hdc sts) in 4″ across and 7 hdc rows are 4” high.
You can write your gauge either as: 8 hdc sts by 7 rows = 4″ x 4″ square
Or as: 8 hdc sts= 4″ and 7 hdc rows = 4″
These numbers will be used in the next section when we figure out how many stitches and how many rows are needed to make each of the garment pieces in step 3.
Step 6: Calculate stitches and rows
Here comes the magical math. At this point, you know the dimensions of each of your pieces (Step 4) and your gauge swatch (Step 5), so you are ready to figure out how many stitches and how many rows are needed for each piece of your garment in Step 3.
This will tell you how many stitches you need to crochet across to get a body panel in the size you wrote down in Step 4, for example. It will tell you how many rows up you need to go in order for that body panel to be your desired height.
To find out how many stitches are needed, the formula is:

Write this equation down and fill in the pieces you know (Gauge stitches and Dimensions per the CYC).
Now, you solve for X (which is the “How many stitches are needed”).
I will give you an example. Using the gauge swatch example above, we know our top will be 8 stiches per 4″. So we will fill in “Gauge stitches” in the equation with 8. We also know the CYC says our panel should be 13″ wide. We will fill in “Dimensions per CYC” with 13. We cross multiply 8 x 13 = 104. The equation is now 104 = 4X (X being “How many stitches are needed”). Divide 104 by 4 and X = 26. You will need 26 stitches to make the body panel.
Remember, you have to start crochet with a foundation chain, so add however many stitches are needed for the foundation row’s turning chain. If you’re doing a single crochet, for example, you’ll only need to add 1. So your final stitch count to make the front body panel is 27.
To find out how many rows are needed, the formula is:
The same!

Follow the same process for number of rows so you know how tall your body panel needs to be. Using our gauge swatch example above (7 rows) and desired body measurements of 14″ tall, we fill in the equation and find:
7 x 14 = 98. The equation becomes 98 = 4(X rows needed). Solve for X, so 98/4 = 24.5. Since this isn’t a round number, you can go up or down a row based on how one more row or one less row will impact the sweater size. Many of the measurements on the CYC website are a range, so keep in mind what measurement you chose from their site as you decide whether to go up or down a row, and use your discretion.
If this makes sense, awesome!! If it doesn’t, read it again. No shame in it.
One note about measurements. Note I said 14″ earlier for the sweater length. That would be quite the crop top. A women’s small is recommended to be 17″, but if you’re adding a detail like a waistband, you have to adjust your dimensions. Make sure to note details like this in your Step 3 sketches and adjust your measurements in Step 4. You should sketch a waistband and note it will be 3″, for example, so your body panel only needs to be 14″ so that your sweater is 17″ when assembled.
Put it all together:
You can now make your front body panel with a foundation row of 27 stitches, and 26 stitches per row going forward. Work that for 24 or 25 rows. Repeat this same pattern for the back body panel.
This is the basic process to figure out the dimensions for a rectangle. The more involved your sweater or top construction, the more thinking and math you will need to do. Again, start simple and build on your learnings.
Sleeves
Sleeves can be done the same way as the body. Sketch what you want yours to look like, write down your measurements per the Craft Yarn Council standards, and use the formulas above to guide how many stitches and rows you need. This will give you rectangular sleeves. You fold them in half, seam them up, and attach them to the sweater where the armhole is. Attach them so the seam is underneath, just
An alternative way to make the sleeves is to crochet them onto the body panels. Once the body panels are completed, you assemble them by seaming the shoulders and then the sides, from the bottom up until you hit where the armhole starts (a measurement you get from the CYC). You would start by attaching your yarn on the wrong side of the piece, at the bottom of the armhole, and crochet around the armhole until you hit your desired length. Again, these would be straight and loose sleeves.
If you want sleeves that are more triangular or tailored in shape, meaning they get narrower towards the wrist, you will need to decrease your stitch count as you work your way down the sleeve. I talk more about sleeve options in this post. Like everything, sleeves can get more complicated, so save that link for when you design your second sweater 🙂

Assembly
At this point, all of your pieces are mostly complete. You may have cuffs, a waistband, or a collar to add, but I recommend assembling the body at this point. You can crochet the cuffs onto the sleeves as the last sleeve step if you’d like, but the waistband should wait until this step when the body panels are sewn together.
Shoulders
To sew the body panels together, start with the shoulders. Choose which side of the body will be the front and mark it with a stitch marker. Lay the two body panels on top of each other with right sides facing each other. I like to use stitch markers to mark the neckhole. The circumference around the neck should be about 16 to 20 inches (40 to 50 cm) for an adult size. You can adjust based on the specific fit and size of the sweater, of course, but for our drop shoulder example, let’s use 20″ for the neckhole.
Since that is circumference and our body panels are laying flat on top of each other, we want to mark a space 10″ wide in the center of the top of our body panels. Mark the space with stitch markers, then count your stitches left and right and try to adjust your markers so you have an even number on each side from the stich markers to the shoulders.
OR, for a more precise route, we can use our measurements from previous steps and calculate how many stitches should comprise the shoulders and how many will be skipped for the neckhole. Let’s do the math.
Our example sweater body panel was 26 stitches across. Our gauge said 4″ = 8 stitches. That means our front body panel’s neckhole of 10″ will be made up of 20 stitches (8 stitches + 8 stitches + 4 stitches = 10″ across). 26 stitches – 20 stitches = 6 stitches will not be part of the neckhole. Since we want even sized shoulders, we divide that in half and so we now know our shoulders will each be 3 stitches wide.
Working on the wrong side, mattress stitch the shoulders together. In our example, you would start at the right side and work left 3 stitches. Fasten off. Count 10 stitches over, join yarn, and mattress stitch from right to left the final 3 stitches. Fasten off.
Body
Now, move on to sewing the sides of the body panels together. I like to use stitch markers and pin the sleeves to their correct spots (the armholes). Your sleeves should be the same size as the armhole measurement recommended by the CYC, so, working on the wrong side, mattress stitch from the bottom of the body panel up towards the bottom of the armhole. You can now attach a sleeve by mattress stitching it onto the body panel. Fasten off and repeat on the other side. Weave in all ends!
Cuffs, Waistbands, and Collars
Earlier, we discussed needing to adjust our dimensions if you are adding a cuff. That is the 3″ piece in my sketch below. If you’re adding a 3″ cuff, for example, your sleeve length will be 3″ shorter than what the CYC suggests.

Want to create elastic-style wristbands (or wrist ribbing) like in the photo below?

Attach your yarn to the right side of your sleeve (RS) and work decreases around if you want the wristband to feel tighter than your sleeve. Plan for an even number of stitches around.
Slip stitch to your first chain and work 7 chains. You will now work basic the basic pattern for any single crochet back loop only ribbing. Work all the way around your sleeve until you are at the beginning.
In a pattern, this would be written as:
Work on the RS. Add yarn at the bottom of the wrist so the seam is not noticeable.
Row 1 (RS): Sl st to first st and ch 7.
Row 2: Start in 2nd from hook and work 6 sc down towards wrist, 2 sc along the wrist, turn.
Row 3: Skip 2 sc, 6 sc blo, ch 1, turn.
Row 4: 6 sc blo, 2 sc along the wrist, ch 1, turn.
Rows 5-20 (22): Repeat Row 3 and 4 all the way around the sleeve. You end with making a Row 3.
Crochet last row and Row 1 together with 6 sc in both loops. Fasten off and weave in ends.
Want a waistband in the same style? What about a collar? Repeat these steps for whatever size band you want, adding or subtracting stitches to make it alter the length.
Neckline
Looking for a neckline other than a collar? Check out this blog post to learn a few other options, like scoop neck, v-neck, crew neck, and more. In the sweater below, I added a collar the same design and pattern as the cuff, just more stitches to make it taller and more rows to go all around the neckline.

Phew, we made it! I hope there were some ah-ha moments in there. Did anything click that you had been wondering about? Now you can take this foundational knowledge and build upon it in so many ways. Let your creativity flow!

Love the Granny Square Sleeve Sweater shown in this blog post? You can make your own! Grab my Granny Square Sweater pattern on Etsy and start crocheting today.

4 thoughts on “How to Design a Crochet Sweater: Step-by-Step Guide”