Are you a beginner or someone looking to learn how to crochet? You can view my tutorials here if you’re just looking to get started. Follow the videos in order according to their title, repeat as needed, and PRACTICE! Don’t give up – there’s a hurdle with crochet, but once you’re over it, you’ll realize it was a smaller hurdle than you thought and you’ll be set up for a lifetime of crocheting!
girl jumping over hurdle
If you’ve completed the video series or already know some crochet basics, you may be looking for the ideal first project. Boy do I have one for you. This project checks all the boxes for the ideal first project – it uses basic stitches, has a repetitive pattern, takes your foundational knowledge and puts it into an actual application, and teaches you how to read a quick and simple pattern.
If you’re not satisfied with your end result, make another one. It’s the best way to work through any issues you may have, like tension inconsistencies. Practicing and repeating crochet is the best way to improve. Trouble shoot anything you can’t solve on your own by searching online or YouTube.
So without further ado, here’s the pattern! It is guaranteed to bring a smile to your face when you whip it out at Starbucks (very sustainable!), and would make an adorable gift.
Tissue Box Crochet Cover Inspired by Funfetti Cake
Tissue box covers: do they instantly make you think of your grandma’s living room? Same here… until I got a never-ending cold and a box of Puffs became a permanent fixture in my living room. Staring at that plain, generic box day after day, I thought: if this box is going to live in my space, it deserves some personality.
Cue crochet.
I’m guessing you get as much joy from making things as I do. So naturally, I turned to crochet patterns, and then inspiration struck: cake as a tissue box? Yes, please.
I scoured a few free patterns online to understand the basic construction, but I wanted mine to feel playful, modern, and minimal—think soft colors, subtle decorations, and, of course, sprinkles. Here’s a peek at my Pinterest inspiration before I started:
My inspo cakes
How I Made It
I started with a square top in the frosting color, added a slit for tissues, and worked the sides in continuous rows. The cake layers were built with alternating stripes of cake and frosting, and I added a faux fur yarn border to give it that kitschy, frosting-like texture. Sprinkles were made with a single skein by cutting sections of the different colors. I like the sprinkles tutorial in this video.
After assembly, I blocked the cover to help it hold its cube shape. The result? A cheerful, modern tissue box cover that livens up any space. My son loved it so much, he requested one for each of his teachers for Valentine’s Day. How cute is that?
Materials & Tools
Yarn: Lion Brand Pound of Love (Pastel Green & White)
Yarn for frosting border: Lion Brand Go for Faux in Baked Alaska
Yarn for sprinkles: Lion Brand Ice Cream in Tutti Frutti
Size G / 4.0 mm crochet hook (or your gauge hook)
Tapestry needle & scissors
Skill Level: Easy Finished Size: 5″ x 5″
Yarn Update & Substitutions
My prototype, which needed one more row!
Note: In the image at the top, you will notice the sides depicting the inside of the cake looks fluffy. I used this yarn because it reminded me of Funfetti. Sadly, that Loops & Threads Cozy Boucle is discontinued. You can still find skeins on eBay or Etsy, or just use Lion Brand Pound of Love as shown in the video below.
Have you ever seen a cuter Kleenex?
Get the Full Pattern
If you’d like to make your own Cake-Inspired Tissue Box Cover, I’ve got the full pattern available on Etsy, with step-by-step instructions.
This is the easiest way to get the finished product looking exactly like my design, without guessing on gauge or color combinations.
Close-up of the sprinkles
Share Your Creations
I love seeing your projects! Tag me on Instagram @nickibyrnescrochet with your tissue box covers so I can celebrate your work.
All images copyright Nicki Byrnes Crochet. This blog is for inspiration and pattern promotion only. Please purchase the pattern on Etsy if you’d like to make this design.
There’s a lot to love about Valentine’s Day. A dozen roses, a big box of chocolates, an oversized teddy bear, and a handwritten love note all sound great, but when you cut through all the noise, February 14th is just a day to tell someone you’re grateful they’re in your life. Whether in a relationship or single, young or old, near family or far away, we all have someone we should acknowledge our love, friendship, or appreciation for.
So how do you show someone what they mean to you without a big, grand gesture? There are plenty of ways that don’t cost much – a Valentine’s Day card sent in the mail with a quick handwritten note, bringing in a neighbor’s garbage cans, a little box of chocolates left on a friend’s porch, or a quick text saying, “Happy Valentine’s Day ❤️.” Research calls these “random acts of kindness” and they are proven to elicit the release of serotonin, or the happiness hormone, in both the giver and recipient. At a minimum, just smiling has been proven to boost the mood of you and those who see you.
Another way to spread happiness on Valentine’s Day is a homemade gift. Not a crafter? How about baking cute cookies like any of these and putting a few in cute bags? Write “Happy Valentine’s Day” with a permanent marker on the outside, include your name, drop a few cookies in a bag, and seal it up. Leave them on the porch, at the door, or in the mailbox of a few people who mean something to you.
If you are a crafter, Pinterest will give a million suggestions that range from easy to complex. This stapled paper heart wreath left on someone’s door handle would be sure to bring a smile. This list has 70 (!!) creative ideas. And if you’re a crocheter like me, there is no shortage of seriously cute Valentine’s Day patterns on Etsy, Ravelry, and Pinterest.
The crochet project I recommend the most for Valentine’s Day is this hat shown above. It is a quick and simple hat construction that is one of my favorite things to make. Adding pink and red instantly makes it festive and uses up scrap yarn you probably already have on hand. It makes a great gift and is really fun to wear around town in the month of February.
It’s fun, easy, and doesn’t cost much, yet leaves a big impact on the receiver. One skein of Lion Brand Wool Ease Thick and Quick yarn will make two hats, and if you have scrap worsted weight yarn, you won’t have to buy any yarn for the pompom and heart. Not a crocheter but love the look? I have a few listed for sale on Etsy here.
You don’t have to be grand or mushy to show the people in your life you care. Small acts of kindness go a long way, and who couldn’t use a little shot of the happiness hormone these days. What are some of your favorite ways you show others you care?
My local team, the Cincinnati Bengals, went to the Super Bowl last year. The city was abuzz with excitement and swathed in orange and black. I didn’t have Bengals spiritwear, so I decided to create an elevated hat design that didn’t look anything like the mass-produced gear sold in stores or at the little stands at the corner of every gas station.
Unlike all of the generic merchandise available, I created a hat with striking features like bold stripes and an oversized pompom. The line of scrimmage in football might be an imaginary line, but the lines or stripes on this hat are anything but invisible. In fact, they are its most prominent feature. Dramatic and distinct with a sporty-meets-stylish vibe, they’re reminiscent of the elastic bands on a vintage letterman’s jacket. Cute, right?
Image Source: Pinterest
Where the stripes end is where the pompom begins, which is intentionally oversized, eye-catching, and full of fun. With soft, chunky yarn, it’s the ideal hat to wear when you’re attending a chilly football game, tailgating outside in the parking lot, and just for everyday wear.
Hi, it’s me
Not a Bengals fan? The colors of this hat are completely customizable. In fact, I’m making one for my cousin in Cleveland by swapping out the black in the pompom for brown. It can be made in any color combination, be it your favorite team’s colors or just your personal preference. What better way to cheer on your team than to look cute doing it?
I sell a limited quantity of finished Bengals hats on my Etsy page here and the pattern is on Ravelry here if you’d like to make your own. It’s a fun make if you have a foundational knowledge of crochet. Share your creation on Instagram by tagging @nickibyrnescrochet and let me know if you have any questions here. I can’t wait to see what you create!
Do you have a stash of old wine corks you’ve saved “just in case?” How about a collection of yarn scraps, because, “you never know?” Good news – I have the perfect project to use them up and create timely gifts, festive winter decor, or cute little handmade toys.
Enter Mini Cork Elves. At just 4″, they use a wine cork for the body, about 5 yards of yarn for the sweater and trim, and about 8 yards for the hat and trim. They look adorable in winter colors like grey and white, Christmas colors of red and green, or any fun combinations of your choosing. For example, I depleted a small stash of mint yarn I had on hand, and combined it with grey and white to look modern and wintery. See some of my color ideas here.
Simple crafts supplies can be used for embellishments, like small buttons and bells for their sweaters, and a tiny pom pom for their hat. See what you have on hand before you run out. You can draw on a face, just eyes, or my favorite, eyes and a little nose, and the result is undeniably adorable.
If you’re familiar with amigurumi, you are comfortable working in the round on a small scale and assembling the parts to create your little elf. If the term is new to you, amigurumi is a form of Japanese crocheting or knitting small objects out of yarn. It is typically done in the round and uses stuffing to create the 3D form. For this project, we are using up the old wine corks you’ve been holding onto instead of stuffing. Or in my case, a giant bag of old corks my sister-in-law gave me! If you’re making a collection of elves and the corks are different sizes, that just gives them personality.
If you’re looking for a unique gift this winter or a sweet little addition to your house, give these elves a try! They can be used if you’re starting the tradition of Kindness Elves instead of an Elf on the Shelf. They’re a wonderful surprise in the mail and are easy to ship due to their small size and light weight. They look adorable as a little army of Santa’s helpers on your shelf. And, they can be packaged up in creative ways and sold at markets. I can only imagine the different characters that will be dreamed up!
If this basket was a person, she would be loads of fun with a touch of glam! But unlike her persona, she is actually very low maintenance. The most distinctive part of this basket is the faux fur, which is used to add trim and create the pompoms. I developed a method to make these pompoms that uses only a crochet hook and the faux fur yarn – no making multiple pompoms with a maker or fork, cutting all those strands, and attaching them individually. With my technique, one long strand of yarn is used and runs all the way around. This means no weaving in a million ends – yay!
She only looks high maintenance
To create the look of pompoms, I use a variation of surface crochet. Surface crochet is a technique that uses slip stitches on top of an already-made piece to create designs on the surface of the work. I used surface crochet to add a “B” to my Bengals hat last winter, pictured below. You can see the individual slip stitches that run along just the surface of the hat. It creates an embellishment on the front that provides depth and texture, while not being visible from the other side of the piece.
The “B” here was created with surface crochet
Clearly, the pompoms appear very different from the “B” above. The fuzziness and texture of the faux fur yarn certainly contribute to the pompom effect, but it really comes down to a couple of key additional steps. Namely, pulling the yarn out to puff it up and pulling the yarn end all the way out and back through as the last step. I will explain this in detail below. For the trim of the basket featured in the video, the process is standard surface crochet all the way around.
Two supplies are needed to create the pompom affect – a crochet hook and faux fur yarn. Any hook will work as long as it can pull the fluffy yarn through, so I recommend size L/8.00mm or larger. I used an N/10.00mm in the video because that is the hook I had out after making the basket. (The yarn I used for the basket is Lion Brand Re-Spun in Sepia Rose.) The faux fur yarn I used is Lion Brand Go For Faux in Baked Alaska. I bought it at Joann, but I have seen it on Amazon, Walmart, and in a set of three on Michaels’ website.
If you’d like to mimic the look of pompoms with just a crochet hook and faux fur yarn, be it for embellishing crochet, knitting, weaving, or any other fiber art, read on for the full instructions. Read them once, watch the video a few times, and then practice for yourself! Let me know if you have any questions.
Faux Fur Pom Pom Instructions
• Hold the faux fur yarn on back side of work (inside the basket in my case)
• Insert hook from the front into the space you’d like the pompom and grab yarn with hook
• Pull yarn through space so 1 loop is on hook
• Insert hook into the space directly to the left
• Grab yarn, pull through space
• 2 loops are on hook
• Pull front loop through second loop on your hook (this is a slip stitch in crochet); you can use your hand to help complete this process, as shown below
Pull the front loop (closest to the hook tip) through the second loop (closest to the hook handle)
• Cut yarn so it has a 64” tail and pull yarn all the way through your stitch
• Insert hook into a nearby space or the same space you worked in and pull yarn end all the way back through so it is now on the back side of your work (inside the basket in my case)
• Insert hook into next space (from the front) for next pompom; I like to alternate pompoms up and down about 1-2” apart
• Repeat steps, beginning with first step above
• Yarn will run along back of work, so no weaving in a million ends!
• Once pompoms are complete, weave ends in
This yarn is slippery, so either weave it back further than you typically would, or tie it off. In the case of the basket in the video or other round projects, the last pompom meets up with the first pompom, so tie the two ends together twice and cut the ends.
That’s it! It takes a lot of words to explain the process, but I assure you, the actual creation is simple. Now watch the video a couple of times, give it a try, and you’ll be pleased with how easy it is, especially if you know how to slip stitch. Let me know what application you use them for – I can only imagine all the possibilities!
I’m sharing a crochet pattern that is one of my favorite things to make! It is a stitch repeat that is fun and so cute. Just look at those puff stitches! They look like little hearts as you make it, which is adorable. I recommend you wear it upside down, though, since your beginning row is usually tighter than your end row and looks better worn close to your face.
I adapted this pattern from the Medora Cowl Pattern from Lion Brand. That original pattern is here. I first used the Medora pattern with a skein of Homespun yarn as recommended, and really like it. The yarn is highly textured and gives a lot of personality to the scarf, but it also makes the stitches hard to see versus standard yarn. This can make it difficult for beginners, so if that is you, read on for the better path for you.
Yarn Recommendation
I found two skeins of Malabrigo Mecha yarn at a local yarn shop and wanted to use it to make a puff stitch cowl. I knew the puff stitches would look amazing in the hand-spun, hand-dyed yarn. The Medora pattern didn’t work perfectly with this yarn, so I modified it to work with the Malabrigo yarn, which is a chunky yarn that is on the thin side. I added rows of single crochet at the top and bottom to get it to stand up more and altered the stitch and row counts. It turned out so pretty. The stitches are highly visible, the colors in the yarn pop, and it lays nicely.
Then, I got the idea to make this cowl in Lion Brand Scarfie yarn. I love the color variation, soft texture, and thickness of this yarn. Like Malabrigo, it is a wool yarn that is on the thinner side of the chunky scale. Unlike Malabrigo, it is on the economical side. Malabrigo Mecha is not outrageous for a premium, hand-dyed yarn at $16 a skein, but this pattern required 1.5 skeins. Lion Brand Scarf retails for $11 and can often be found on sale at stores like Michael’s and Joann Fabrics. There are also 312 yards per skein versus 130 yards in a Malabrigo skein (or hank). I found mine at a Joann’s in Atlanta for around $8 a skein and chose the color Sea Foam/Clay.
The pattern in Scarfie yarn worked up quickly and looks great, just like the Malabrigo version. If you have a basic knowledge of how to crochet, you can make this cowl. Just take your time and trouble shoot online when you need it. If you are an experienced crocheter, you will make this in a snap! It’s great for gifting because it is such a fast make and looks intricate with all the puff stitches. The self-striping ombre effect of Scarfie yarn makes it so easy to add more visual interest and really sets it all off.
Puff stitch explanation: Yarn over, insert hook in indicated st, yarn over and draw up a loop (3 loops on hook), *yarn over, insert hook in same st, yarn over and draw up a loop; rep from * once more, yarn over, draw through all 7 loops on hook. Make generous sized loops.
Abbreviations:
Beg = begin(s)(ning)
Ch-space = space previously made
Rnd(s) = round(s)
Sl st = slip stitch
Ch(s) = chain(s)
Rep = repeat(s)(ing)
Sk = skip
St(s) = stitch(es)
Sc = single crochet
Skill Level: Easy
Size: One size
Finished circumference: ~22” (56 cm)
Finished height: ~9” (23 cm)
Materials:
1 skein of Lion Brand Scarfie yarn (312 yds each)
Size K (6.5 mm) crochet hook
Yarn needle
Scissors
Pattern:
Loosely ch 60; join with sl st in first ch to make a ring, taking care not to twist ch.
Rnd 1: Sc in each st around.
Rnd 2: Ch 3 (does not count as st), (Puff st, ch 1, puff st) in same ch as joining, *sk next 2 ch, (puff st, ch 1, puff st) in next ch; rep from * to last 2 ch; join with sl st in top of beg ch (40 puff sts).
Rnds 3-14: Ch 3 (does not count as a st), turn, (puff st, ch 1, puff st) in each ch-1 sp to end of rnd; join with sl st in top of beg ch.
Rnd 15: Sc in each st around.
Fasten off and weave in ends. Wear so the first row is closer to the chin and the last row is at the neck.
If you want to learn to crochet, a huge unknown is where to begin. There is an overwhelming amount of videos and articles online to reference, so how do you choose? What step is the first to learn? What exactly are you supposed to be doing with your hands? Is that teacher demonstrating a proper technique? And then what step is next?
This confusion was a big barrier for me. I put off learning to crochet because books with simple images confused me and I didn’t know where to start online. When I finally committed to learning, I spent far too much time sifting through YouTube to find the right videos.
Well, forget all that, because I’m simplifying the process and telling you what exactly you need to do. I created basic, easy to follow videos for you with my teaching techniques. They are a combination of my instructor training from the Craft Yarn Council and my in-class experience. I developed different tips and tricks based on how I observed people learn best, common sticking points people most often fumble with, and different anecdotes that I found most helpful for my students. Those videos can be found here.
The Process
You will start with Part 2. I need to set aside time to finally record and upload Part 1, which will be an intro with crochet background information that I share in my classes to set my students (types of yarn, hooks, stitches, etc.). It is on my to-do list!
The critical part to learning how to crochet starts with my video titled Part 2, so start there and work your way through to Part 6. Spend as much time as you need on each video. Watch, rewind, try for yourself, pause, rewind, and practice again.
The key to learning crochet is to maintain a level of patience and persistence. Learning to crochet will most likely feel awkward and unnatural at first. This is completely normal. But keep at it! Things will click before you know it.
Your First Project
Once you’ve mastered parts 2-6, you’re ready for your first project. This is arguably the most critical step. You have a foundational knowledge at this point of how to properly hold the yarn and hook and complete the crochet basic stitches, so now you need to put them into practice. This forces you to understand how to turn to make even rows, improve your tension, change colors or yarn if needed, and finish off. In the meantime, you will be learning how to read a pattern.
I recommend practicing row after row of single crochet until you reach about 60″.Read why this is the ideal first project in this blog post so you understand the importance of that first perfectly imperfect project. No matter how ugly your scarf turns out, you will be proud of it and treasure it as you continue on your crochet journey. It might sound repetitive to do row after row of the same stitch, but that repetition is what helps you learn and grow.
Another reason this is the ideal first project is that you don’t need to know how to read a complicated pattern to make that first scarf. It is beginner-friendly.
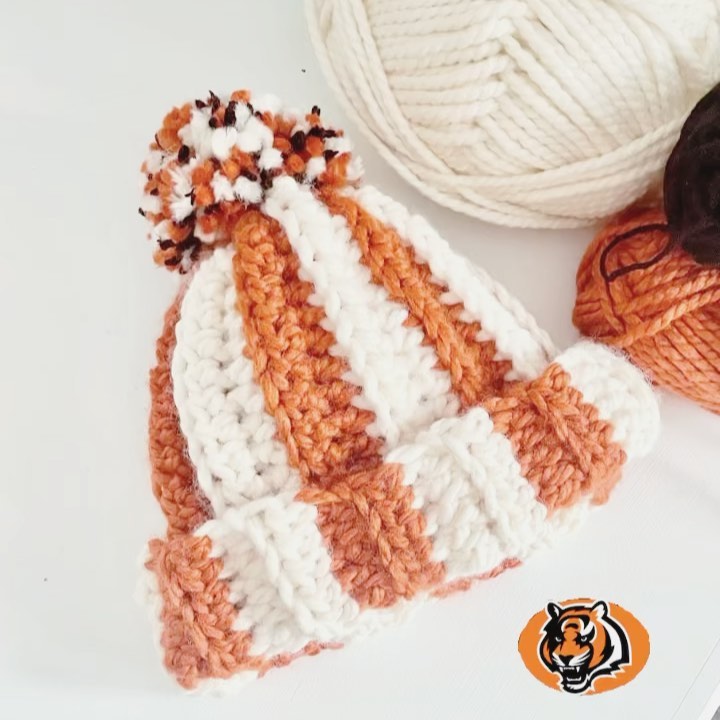
A chunky beanie I designed years ago is a crowd pleaser. It’s warm, cozy, cute, and goes with everything. So when my local football team, the Cincinnati Bengals, went to the Super Bowl last year and apparel was hard to find, I decided to adapt my favorite hat accordingly. I added pumpkin orange stripes to give it a vintage look, like it could have been worn in the 70s under Friday night lights. I added black to the oversized pom pom to drive home the “Bengals” notion and was quite pleased with the result. I sold a couple on Etsy and received compliments when I wore it.
My Bengals-inspired hat
After the success of that hat, I had an idea to alter it and create a coordinating piece. I was happy with how it turned out, so on a whim, I reached out to a crochet magazine to see if they were looking for patterns. They were great with communication and let me know right away about the upcoming patterns they are looking for. Serendipitously, my project fit one of their issue descriptions perfectly and the deadline was just two weeks away. I completed their submission form and crossed my fingers. I heard back from someone at the publication who saw my address and asked if I am a Buckeye like she is – why, yes, I am! She was in the band (TBDBITL), which I was not, but fully appreciate.
A couple of weeks later, I heard back that my pattern was accepted! I can’t even tell you how happy that email made me. So by next year I will be able to say I’m a published crochet designer. I’m so excited for other people to make my design because it’s a straightforward pattern both experienced and beginner crocheters will enjoy; one which results in an effortlessly cozy yet stylish look. Experienced crocheters will be able to make it in no time and beginners who know the foundational stitches will enjoy putting their basic skills into practice and building on their knowledge.
All this to say, whether it’s luck, fate, or coincidence, I’m so happy I reached out that day and tried something new. I accomplished a goal and I can tell my kids are excited about it, too. If there is something you’ve been thinking about, this is your sign to designate a little time in your day towards that goal. You never know when it’s YOUR time.
This is not the best time to do this. I’m sitting at my family lake house on an uncomfortable wooden chair, across from my husband as he works remotely. He’s a key pounder who takes calls from his computer so you don’t know he’s on the phone until someone’s voice starts coming out of his little speaker. Our kids are in the kitchen, a direct shot from me in our cozy little cottage. They’ve been fed snacks, it’s not lunch time yet, and they have pirate Lego’s from the 80s that should keep them happy and entertained for at least a few minutes. (As my middle child whines that his sister called him a “maniac”…could be worse, and they’re quiet again.)
Or maybe this is the best time to do this. I’m surrounded by windows with just enough sunlight streaming in that it’s bright but not blinding. There are two hummingbirds hovering to my left out the window drinking their sweet nectar water my mother-in-law religiously supplies them. The water is calm, the sky is blue, and the area is quiet. It’s Friday morning in August, which means vacationers are dwindling at this point in the summer and weekenders haven’t gotten here yet.
Image: View of Indian Lake, Ohio
It’s Now or Never
When it comes down to it, there is probably never a best time to do something you find daunting. That is this blog. I wanted to capture my crochet journey ever since I taught myself 4 years ago because I knew others could benefit from my learnings. I always had an excuse not to start, though, whether it was time, kids, not knowing where to start, and so on. I know I’m not alone in this tendency.
Let’s back up a bit. Long before I threw caution to the wind and wrote this very first blog post, I didn’t know how to crochet, but did have great admiration for it. Crochet is something I always loved about my grandma. I revered everything she made and cherish the memories of her trying to teach me as a child. She showed me the basic steps and we created a little swatch together, but somehow I never seemed able to do it without her sitting next to me. It was hard, I wasn’t naturally inclined to persevere through something frustrating and difficult, and so I abandoned it for 25+ years.
Image: My first crochet swatch
The Power of a Growth Mindset
Many years later, my two oldest kids went to a summer day camp and I found myself with a little free time. I was used to them being around 24 hours a day and at rather demanding ages, so a few hours without them and only my youngest home felt liberating. I wanted to do something for myself during nap times that week, and a book I had read recently helped me narrow down my project. I had just finished the book Mindset, which argues you can control your abilities to learn new things and your successes in life with a growth mindset. I had most certainly spent my life with a fixed mindset, which allowed me to think crochet (among many other things) was just not for me all those years ago. But now, I felt empowered to try it again. I had never lost the desire to learn, and the thought of crochet still brought back the warm, sentimental feelings of nostalgia and the exciting, creative feelings of crafting.
I was determined to try harder than I was predisposed and was equipped with motivation fresh from reading the book. I dug out my grandma’s old hook she gave me, originally a pink metal hook but worn silver from her years of use. I had kept it in a storage bin along with off-white yarn she gave me (which I will always save and never use #sentimentalhoarder). I knew I needed more than just text instructions and flat images to learn because I had looked at how-to books over the years and they left me more confused than when I started. So, I pulled up YouTube and searched “how to crochet.”
What I found was both amazing and overwhelming. I was pleased to see thousands of videos from many creators, but I was intimidated by not knowing where to start. This video looked clean and simple, but that video explained things differently. This video showed nice angles of the demonstration, but that video had better audio. Where to start, which video to watch, and how do I know if I’m doing this right? How do I troubleshoot? And after that, what do I do next?
How I Learned
I stumbled through it that week and mastered some of the basics. Everything my grandma taught me had long been forgotten, so I started with how to hold the yarn and hook, make a slip knot, make a chain stitch, and create a single crochet. I just kept repeating row after row of single crochet until I realized it was starting to look like a scarf. I decided to keep going and actually make a scarf, which meant I had to research how to start and end rows, count stitches so my rows were even, and switch to new yarn when I ran out of the initial scrap yarn I started with. I reached 60″ and felt content with my progress. I had made the most beautiful, unattractive scarf I had ever seen. I was so proud!
Image: My beautiful single crochet scarf
I didn’t realize the importance of this first stage of my learning experience until years later. I’ll talk about the rest of my crochet story soon, but for now, I’ll skip ahead a few years. I was teaching crochet at a local yarn shop and realized the first step after learning the basics needs to be that beautifully imperfect first project. A single crochet scarf, for example, is the perfect chance to practice foundational steps, improve tension, learn to count, turn, and finish. So many people want to dive in and make something right away, but if the pattern is too complicated for their level or they don’t have the basics mastered, the end result will be frustration or disappointment.
Below is a photo from one of my in-person classes. A student taught herself on Youtube before attending our class and had attempted a pot holder. She went home and put the critical steps we discussed into practice. The bottom half is her first attempt after teaching herself online, and the top half is what she did after our one class together. Notice the improved tension and more even rows. Things like holding the yarn and hook a proper way and counting stitches (including knowing how to identify and count them) all result in a less stressful process and more successful outcome.
Image: Crochet sample a student brought in showing her improvement
Let Me Show You The Way
It occurred to me the teaching process is overly complicated and outdated, not taking advantage of modern technology and learning methods. So many people have a desire to learn something like crochet or knitting, but find it too intimidating, don’t know where to start, and either never start or give up too quickly. I want to clear that up and show you there is an easier way to learn.
I want to show people there is a way to learn in an efficient and straight-forward way, with my anecdotes thrown in to help make things click quicker. My goal here is to make learning simpler and more successful, with a secondary purpose of sharing what so many of us love to talk, read, and hear about – yarn, crafting, fiber arts, and our beloved crochet. I’ll also share patterns I recommend – most of which are free patterns I found on the internet, tested, and liked. Some of the patterns will be my own creations.
There, first blog post done! That wasn’t so hard (says every procrastinator everywhere). I hope you join me on this journey and we can create a community of yarn and crochet lovers who uplift and inspire each other.